![[Nuxt.js]componentsのButtonを使ってDeleteボタンDeleteBtnを実装](https://nolyc.net/wp-content/uploads/2021/06/スクリーンショット-2021-06-29-15.19.25.png)
いつもお世話になっております。
最近アトミックデザインなるものを覚えたのですが、具体的な使い方がピン…!と来ていませんでした。
componentsをatomsやorganismsに分けるのはわかるんですけどmoleculesって一体どんなもんに使うのよ?ってなもんでした。
ところがtodoリストでリストしたアイテムのdeleteボタンを$emitで実装する過程で、なるほど!と膝を叩いたので備忘録的に残しておきたいと思います。
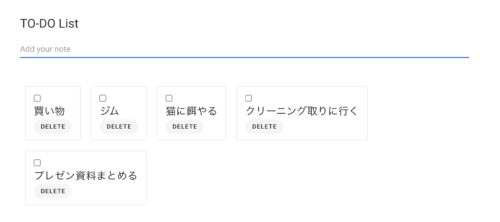
このアイテム1つ1つに入っているDELETEボタンです。
親であるtodo.vueはこんな感じ。UIはVuetifyを使っています。
<v-card
  v-for="(todo, index) in todos"
  :key="index"
  max-width="344"
  outlined
  style="margin: 10px"
  >
  <v-list-item>
    <v-list-item-content style="display: block">
      <input v-model="todo.isDone" type="checkbox" />
      <v-list-item-title
        class="text-h6 mb-1 item-title"
        :class="{ done: todo.isDone }"
      >
        {{ todo.item }}
      </v-list-item-title>
      <DeleteBtn @deleteTodo="deleteItem(index)" />
    </v-list-item-content>
  </v-list-item>
</v-card>
この後DeleteBtnで<v-btn>作って$emitしてもよかったのですが、既に<Button>コンポーネントは作成済みでした。
<template>
  <v-btn
    :color="color"
    :class="classValue"
    :tile="tile"
    :disabled="disabled"
    :text="text"
    :outlined="outlined"
    :block="block"
    :elevation="elevation"
    :small="small"
    :rounded="rounded"
    @click="click"
  >
  <slot></slot>
  </v-btn>
</template>

<script>
export default {
  props: {
    click: {
      type: Function,
      required: true,
    },
    color: {
      type: String,
      default: '',
    },
    classValue: {
      type: String,
      default: '',
    },
    tile: {
      type: Boolean,
      default: false,
    },
    disabled: {
      type: Boolean,
      default: false,
    },
    text: {
      type: Boolean,
      default: false,
    },
    outlined: {
      type: Boolean,
      default: false,
    },
    block: {
      type: Boolean,
      default: false,
    },
    elevation: {
      type: String,
      default: '0',
    },
    small: {
      type: Boolean,
      default: true,
    },
    rounded: {
      type: Boolean,
      default: true,
    },
  },
}
</script>
既に作成したButtonはデフォルトのButtonとして残すのがUIの統一性を考えるにしてもいいような気がします。
コンポーネントにコンポーネントも配置できるので、DELETEボタンのファイルであるDeleteBtn.vueのボタン部分にButton.vueを使用すれば良いのですね。
このように粒度の小さいコンポーネントを用意しておき(atoms)、小さいコンポーネントを組み合わせて大きめのコンポーネント(molecules)を作るようにデザインするのに向いているのがアトミックデザインの長所ですよ〜というのは私の師匠からの受け売りです。
<template>
  <div>
    <Button :click="itemDelete">DELETE</Button>
  </div>
</template>

<script>
export default {
  methods: {
    itemDelete() {
    this.$emit('deleteTodo')
    },
  },
}
</script>