[node.js]バージョン切り替え方法

node.jsバージョン切り替え方法

npm run dev

(thread_id_key != 0x7777), function find_thread_id_key, file ../src/coroutine.cc, line 134

複数のプロジェクトを扱うようになると、プロジェクトごとにnode.jsのバージョンを切り替えなければならないシーンが出てきます。上記のエラーは、現在使用しているnode.jsのバージョンが合わなかった際に出てきたエラー。

別のプロジェクトのブランチを切ってきて、npm run devした時のものです。

いろいろ調べてみて、nodeのバージョンを落としたりfiber取り除いたりしてみたのですが解決せず…。

結局、上司に泣きついて解決した作業工程をまとめておきます。

※当方Max OS 11.2.3使用

問題はnode.jsのバージョンにあった!

結論から言うと、今回の問題はプロジェクトにマッチしないnode.jsを使用していることがエラーの原因でした。というわけで、パッケージマネジャを使用し、プロジェクトにマッチしたnode.jsに切り替えます。

node.jsのバージョン管理には、nodebrewを使用する方法や、nodenvを使用する方法など、いろいろあります。

プロジェクトによって使用しているパッケージのバージョンは異なるため、それに合わせたnode.jsを使用する際、こうしたパッケージマネジャを使えば簡単にnode.jsのバージョンが切り替えられるというわけです。

今回は、nodenvを使用してnode.jsのバージョンを切り替える方法を記載します。

nodenv,anydenvが入っていることを前提として書き進めます。双方のインストール方法はこちらから

MacにNode.jsをインストール(anyenv + nodenv編) – Qiita

nodenvを使用してnode.jsのバージョンを切り替える

node.jsのバージョン確認は、 node -vでできます。

@MeowBook nks-frontend % node -v
v15.14.0

つづいて nodenvででコマンドを確認。

@MeowBook nks-frontend % nodenv
nodenv 1.4.0+3.631d0b6
Usage: nodenv <command> [<args>]

Some useful nodenv commands are:
   commands    List all available nodenv commands
   local       Set or show the local application-specific Node version
   global      Set or show the global Node version
   shell       Set or show the shell-specific Node version
   install     Install a Node version using node-build
   uninstall   Uninstall a specific Node version
   rehash      Rehash nodenv shims (run this after installing executables)
   version     Show the current Node version and its origin
   versions    List installed Node versions
   which       Display the full path to an executable
   whence      List all Node versions that contain the given executable

See `nodenv help <command>' for information on a specific command.
For full documentation, see: <https://github.com/nodenv/nodenv#readme>

nodenv versions で既にインストール済みのバージョンを確認。

@MeowBook nks-frontend % nodenv versions
  system
* 15.14.0 (set by /Users/xxx/Documents/xxx-frontend/.node-version)
  16.0.0
  16.2.0

つづいてnodenv install --list で、node.jsインストール時に登録されたバージョンを確認します。

@MeowBook nks-frontend % nodenv install --list
0.1.14
0.1.15
0.1.16
0.1.17
0.1.18

中略

15.13.0
15.14.0
16.0.0
16.1.0
16.2.0
chakracore-dev
chakracore-nightly
chakracore-8.1.2

中略

この時点で任意のバージョンが表示されていなければ`anyenv update `でリストをアプデし、再度`nodenv install --list `で任意バージョンがインストールされていることを確認。

anyenvについてはこちら。

nodenv,anydenvを使ったNode.jsのアップデート

任意のバージョンが表示されていることを確認したら、

nodenv install 16.1.0 のようにバージョンを指定し、node.jsをインストールします。

@MeowBook xxx-frontend % nodenv install 16.1.0 
Downloading node-v16.1.0-darwin-arm64.tar.gz...
-> <https://nodejs.org/dist/v16.1.0/node-v16.1.0-darwin-arm64.tar.gz>
Installing node-v16.1.0-darwin-arm64...
Installed node-v16.1.0-darwin-arm64 to /Users/xxx/.anyenv/envs/nodenv/versions/16.1.0

nodenv local 16.1.0 カレントディレクトリで適用したいバージョンを指定し、設定したら、最後にnode -v できちんと設定できているか確認。

@MeowBook xxx-frontend % nodenv local 16.1.0  
@MeowBook xxx-frontend % node -v              
v16.1.0

npm install で消したnode_modulesを再ダウンロードし、npm dev runでページが見られるか確認しましょう。

補足:vueとvue-template-compilerのバージョンが合わないよ!と言うエラーが出ることがあります。

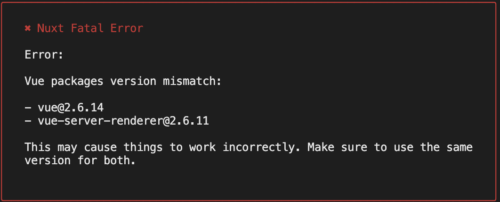
その際は、package.jsonのdependenciesオブジェクト内のバージョン部分を変更し、古い方のバージョンを新しいバージョンの数値に合わせましょう。

"dependencies": {
  "@nuxtjs/axios": "^5.3.6",
  "@nuxtjs/device": "^1.2.7",
  "@nuxtjs/markdownit": "^1.2.9",
  "@nuxtjs/pwa": "^3.0.0-0",
  "axios": "^0.19.0",
  "chart.js": "^2.8.0",
  "chartjs-plugin-annotation": "^0.5.7",
  "chartjs-plugin-datalabels": "^1.0.0"
  , "cookie-universal-nuxt": "^2.0.18",
  "cookieparser": "^0.1.0",
  "crypto-js": "^4.0.0",
  "flatpickr": "^4.6.3",
  "js-cookie": "^2.2.1",
  "markdown-it-toc": "^1.1.0",
  "nuxt": "^2.0.0",
  "tabulator-tables": "^4.4.3",
  "vanilla-autokana": "^1.1.6",
  "vue": "^2.6.14", // ここか
  "vue-chartjs": "^3.4.2",
  "vue-flatpickr-component": "^8.1.4",
  "vue-server-renderer": "^2.6.14",
  "vue-template-compiler": "^2.6.14", // ここ
  "vuetify": "^2.2.11",
  "vuex-persistedstate": "^2.5.4",
  "vuex-shared-mutations": "^1.0.2"
},

おしまい

[Nuxt.js]フィルターを作成する

Nuxtのファイル構成を意識したNuxt.jsでのフィルターの作成方法です。Vueのやり方だと上手く行かなかったため、備忘録。

グローバルフィルター

pluginsディレクトリ内にjsフォルダを作成し、どのページでもフィルタが読み込めるようにする方法です。今回は、数字を3桁ごとにカンマで区切るフィルタと、英語の文字列を全て大文字にするフィルタを作成します。

詳しく

まずはpagesディレクトリ内にfilter.vueの雛形を作成します。

<template>
  <div>
    <Header />
    <v-container>
      <!-- local filter -->
      <h2>Mustash</h2>
      <p>{{ price | numberFormat }}</p>
      <p>{{ text | toUpperCase }}</p>
      <h2>b-vind</h2>
      <input type="text" :value="price | numberFormat" />
      <input type="text" :value="text | toUpperCase" />
    </v-container>
  </div>
</template>


<script>
export default {
    data() {
      return {
        price: 25400,
        text: 'Hello, Nuxt.js!',
    }
  },
}
</script>
グローバルフィルターはpluginsディレクトリ内にjsフォルダを作成し、その中にフィルターの機能を記述します。
import Vue from 'vue'

Vue.filter('toUpperCase', (value) => {
  return value.toUpperCase()
})

Vue.filter('numberFormat', (value) => {
  return value.toLocaleString()
}

最後に、nuxt.config.jsにグローバルフィルタの場所を追記します。

export default {
  plugins: [ { src: '~plugins/filter.js' } ],
}

ローカルフィルター

ローカルフィルターは、pagesディレクトリ内の各ページに定義するそのページ限定のフィルターです。せっかくなので、次は長い文字列を短く表現し、省略した以降の文字は「…」と表現させる「引数あり」のフィルターを作成します。

長文
これを
こう

詳しく

まずは雛形を作成します。

<template>
  <div>
    <v-container>
      <p>{{ longText }}</p>
    </v-container>
  <Footer />
  </div>
</template>

<script>
export default {
  data() {
    return {
      longText:
        'Lorem ipsum dolor sit amet, consectetur adipiscing elit, sed do eiusmod tempor incididunt ut labore et dolore magna aliqua. Ut enim ad minim veniam, quis nostrud exercitation ullamco laboris nisi ut aliquip ex ea commodo consequat. Duis aute irure dolor in reprehenderit in voluptate velit esse cillum dolore eu fugiat nulla pariatur. Excepteur sint occaecat cupidatat non proident, sunt in culpa qui officia deserunt mollit anim id est laborum.',
    }
  },
}
</script>

この時点ではこれです。

フィルターを加えます。

<script>
export default {
  filters: {
    readMore: (text, length, suffix) => {
      return text.substring(0, length) + suffix
    },
  }

  data() {
   // 省略
}
</script>

readMoreの第一引数が適用する文字列、lengthが長さ、suffixが接尾辞です。

文字列textに対し.substringメソッドで0番目の文字から第二引数で渡した文字数(length)の、文字列の部分集合を返し、最後に指定したsuffixを加える、という処理が書かれています。

上記フィルターをlongTextに適用すると、コード全文は下記のようになります。

<template>
  <div>
    <v-container>
      <p>{{ longText | readMore(20, '...') }}</p> // フィルタを適用
    </v-container>
  <Footer />
  </div>
</template>

<script>
export default {
  filters: {
    readMore: (text, length, suffix) => {
      return text.substring(0, length) + suffix
    },
  }

  data() {
    return {
      longText:
        'Lorem ipsum dolor sit amet, consectetur adipiscing elit, sed do eiusmod tempor incididunt ut labore et dolore magna aliqua. Ut enim ad minim veniam, quis nostrud exercitation ullamco laboris nisi ut aliquip ex ea commodo consequat. Duis aute irure dolor in reprehenderit in voluptate velit esse cillum dolore eu fugiat nulla pariatur. Excepteur sint occaecat cupidatat non proident, sunt in culpa qui officia deserunt mollit anim id est laborum.',
    }
  },
}
</script>

フィルターでは第三引数まで指定していたのに、textの引数は書かれていないことに注意してください。


フィルターはv-bind式でもできる

mustache構文を使わないでフィルターを適用させたい時もあるかと思います。2.1.0以降でサポート。

https://jp.vuejs.org/v2/guide/filters.html

<!-- mustaches -->
{{ message | capitalize }}

<!-- v-bind -->
<div v-bind:id="rawId | formatId"></div>

v-bind式の構文は、

<div v-bind:id=”フィルタに渡すデータ | フィルタ”></div>

です。


おしまい

[Nuxt.js]AccuWeatherのAPIを使ってお天気アプリを制作

Nuxt.jsでAPIを使う修行を自分に課していました。というわけで、今回はお天気アプリです。

トップページのカードに、このように表示させます。

取ってきている情報自体は、任意の場所のその日のお天気と気温(と日付)だけなのですが、なかなかどうして時間のかかったものです。さて、復習しますか。

雛形となるカードを用意

まずは雛形を用意。お馴染みVuetifyを使っています。

<template>
  <div>
    <v-card class="mx-auto" max-width="374">
      <v-img
        height="250"
        src="https://images.unsplash.com/photo-1558486012-817176f84c6d?ixid=MnwxMjA3fDB8MHxwaG90by1wYWdlfHx8fGVufDB8fHx8"
        gradient="to top, rgba(255,255,255,.4), rgba(255,255,255,.9)"
      >
        <v-list-item two-line>
          <v-list-item-content>
            <v-list-item-title class="text-h5">
              CURRENT WEATHER
            </v-list-item-title>
            <v-list-item-subtitle>YYYY-MM-DD</v-list-item-subtitle> // 今日の日付を取ってくる
            <v-list-item-subtitle>TOKYO</v-list-item-subtitle>
          </v-list-item-content>
        </v-list-item>

        <v-card-text>
          <v-row align="center">
            <v-col text-h2 cols="12">
              <v-list-item-subtitle>お天気ステータス</v-list-item-subtitle>
            </v-col>
            <v-col cols="12">
              <v-card-subtitle class="text-h1 temp">温度
                <span class="celcius">&#8451;</span>
              </v-card-subtitle>
            </v-col>
          </v-row>
        </v-card-text>
      </v-img>
    </v-card>
  </div>
</template>

AccuWeatherから情報を取ってくる

さてこのAccuWeather、ちょっと苦戦しました。アクセス1日50回(だったかな?)なら無料のお天気APIです。

https://developer.accuweather.com/

必要なことは大体公式サイトに載っているのですが、ここからお天気の情報を取ってくるには何段階かステップが必要です。

  1. AccuWeatherに登録する
  2. AccuWeatherでAppを作る
  3. APIキーゲト
  4. ロケーションキーをゲト

AccuWeatherに登録する

まずは公式サイトでアカウントを作成します。

https://developer.accuweather.com/

右上のREGISTERからですね。

AccuWeatherでAppを作る

諸々入力し終え、アカウントが作成できたら、メニューバーのMY APPからAdd a new Appを選択します。Appの名前とかはどうでもいいです。今回は無料版を使うため、Productの箇所ではLimited Trialを選択しましょう。


APIキーゲト

上記の設定を終えたらCreate Appボタンを押します。

APIキーが取得できました。

ロケーションキーをゲト

APIキーをゲットしたら次はロケーションキーが必要ですね。

こちらにアクセスするとロケーションキーがわかります。

https://www.accuweather.com/

検索窓から取得したいロケーションを入力します。「東京」や「サンフランシスコ」などで選択肢が表示されます。

ページ遷移した先のURL最後の数字がロケーションキーです。

AccuWeatherのメニューバーAPI REFERENCE > Forecast APIを選択し、取りたいデータを選択します。今回はHour of Hourly Forecastsを選択しました。

https://developer.accuweather.com/accuweather-forecast-api/apis/get/forecasts/v1/hourly/1hour/%7BlocationKey%7D

一番上のResource URLの部分に、お天気情報を取得するためのURLが書かれていますね。

http://dataservice.accuweather.com/forecasts/v1/hourly/1hour/{LOCATIONKEY}

この{LOCATIONKEY}の部分を先ほど取得した数値に置き換え、APIキーをつけてアクセスすると格納されている情報が見られるようになります。

例:http://dataservice.accuweather.com/forecasts/v1/hourly/1hour/226396?apikey=XXX

XXXの箇所は、先ほど取得した自分のAPIに置き換えてください。

アクセス先

Chromeの拡張機能JSON Viewを使うと見やすいです。

こちらのURLをスクリプトのmounted部分で使います。

取得したお天気情報をaxiosでゲットし、変数に代入する


APIキーはconstantsディレクトリのdefine.jsに記載しました。またaxiosはダウンロードしている前提です。インストール方法はこちらから

https://www.npmjs.com/package/axios

export const API_KEY = 'xxx'
<script>
import axios from 'axios'
import { API_KEY } from '~/constants/define'


export default {
  data() {
    return {
      forecasts: [],
    }
  },
  mounted() {
    axios
      .get(
        'http://dataservice.accuweather.com/forecasts/v1/hourly/1hour/226396' +
        `?apikey=${API_KEY}`
      )
      .then((response) => (this.forecasts = response.data))
  },
}
</script>

これで、先ほどアクセスした http://dataservice.accuweather.com/forecasts/v1/hourly/1hour/226396?apikey=XXX の情報をforecasts[]に代入することができました。

画面に天気を表示させてみます。カードにv-forを追加しました。

    <v-card-text v-for="forecast in forecasts" :key="forecast.id">
      <v-row align="center">
        <v-col text-h2 cols="12">
          <v-list-item-subtitle>{{
            forecast.IconPhrase
          }}</v-list-item-subtitle>
        </v-col>
        <v-col cols="12">
          <v-card-subtitle class="text-h1 temp">
            {{ forecast.Temperature.Value | toCelsius | mathFloor }}
            <span class="celcius">℃</span>
          </v-card-subtitle>
        </v-col>
      </v-row>
    </v-card-text>

気温は華氏表記だったため、フィルターを作成し摂氏表記にします。

        <v-col cols="12">
          <v-card-subtitle class="text-h1 temp">
            {{ forecast.Temperature.Value | toCelsius | mathFloor }}
            <span class="celcius">℃</span>
          </v-card-subtitle>
        </v-col>

Scriptには下記を追記

<script>

// 省略
export default {
  filters: {
    toCelsius(value) {
    return ((value - 32) * 5) / 9 // fahrenheit to celsius
    },
    mathFloor(value) {
    return Math.floor(value)
    },
  },


<script>
import axios from 'axios'
import { API_KEY } from '~/constants/define'


export default {
  filters: {
    toCelsius(value) {
    return ((value - 32) * 5) / 9
    },
    mathFloor(value) {
    return Math.floor(value)
    },
  },
  data() {
    return {
      forecasts: [],
      hasError: false,
      loading: true,
      now: '',
    }
  },
  mounted() {
    this.now = this.$dayjs().format('YYYY-MM-DD')
    axios
      .get(
        'http://dataservice.accuweather.com/forecasts/v1/hourly/1hour/226396' +
        `?apikey=${API_KEY}`
      )
      .then((response) => (this.forecasts = response.data))
      .catch(function (error) {
        console.log(error)
        this.hasError = true
      })
      .finally(() => (this.loading = false))
  },
}
</script>

あとは、dayjsを使い今日の日付を表示、error時とloading時の表示を追加して完成です。


      <v-list-item-content>
        <v-list-item-title class="text-h5">
          CURRENT WEATHER
        </v-list-item-title>
        <v-list-item-subtitle>YYYY-MM-DD</v-list-item-subtitle> // 今日の日付を取ってくる
        <v-list-item-subtitle>TOKYO</v-list-item-subtitle>
      </v-list-item-content>

    <v-card-text v-for="forecast in forecasts" :key="forecast.id">
      <section v-if="hasError">Error.</section>. // エラーメッセージを表示
      <section v-else> // エラーじゃない時は正常に表示
        <div v-if="loading">Loading...</div> // ローディング時の表示を追加
          <v-row align="center">
          </v-row>
        </section>
      </v-card-text>
 // 省略

export default {
 // 省略
  data() {
    return {
      forecasts: [],
      hasError: false,
      loading: true,
      now: '',
    }
  },
  mounted() {
    this.now = this.$dayjs().format('YYYY-MM-DD')
    axios
      .get(
        'http://dataservice.accuweather.com/forecasts/v1/hourly/1hour/226396' +
        `?apikey=${API_KEY}`
      )
      .then((response) => (this.forecasts = response.data))
      .catch(function (error) {
        console.log(error)
        this.hasError = true
      })
      .finally(() => (this.loading = false))
  },
}
</script>

完成コード

すみません所々 インデントが合ってないかもしれないです

<template>
  <div>
    <v-card class="mx-auto" max-width="374">
      <v-img
        height="250"
        src="https://images.unsplash.com/photo-1558486012-817176f84c6d?ixid=MnwxMjA3fDB8MHxwaG90by1wYWdlfHx8fGVufDB8fHx8"
        gradient="to top, rgba(255,255,255,.4), rgba(255,255,255,.9)"
      >
      <v-list-item two-line>
        <v-list-item-content>
          <v-list-item-title class="text-h5">
            CURRENT WEATHER
          </v-list-item-title>
         <v-list-item-subtitle>{{ now }}</v-list-item-subtitle> // 今日の日付を取ってくる
         <v-list-item-subtitle>TOKYO</v-list-item-subtitle>
       </v-list-item-content>
     </v-list-item>

      <v-card-text v-for="forecast in forecasts" :key="forecast.id">
        <section v-if="hasError">Error.</section>
        <section v-else>
          <div v-if="loading">Loading...</div>
          <v-row align="center">
            <v-col text-h2 cols="12">
              <v-list-item-subtitle>{{
                forecast.IconPhrase
              }}</v-list-item-subtitle>
            </v-col>
            <v-col cols="12">
              <v-card-subtitle class="text-h1 temp">
                {{ forecast.Temperature.Value | toCelsius | mathFloor }}
                <span class="celcius">℃</span>
              </v-card-subtitle>
            </v-col>
           </v-row>
         </section>
        </v-card-text>
      </v-img>
    </v-card>
  </div>
</template>


<script>
import axios from 'axios'
import { API_KEY } from '~/constants/define'


export default {
filters: {
toCelsius(value) {
return ((value - 32) * 5) / 9
},
mathFloor(value) {
return Math.floor(value)
},
},
  data() {
    return {
      forecasts: [],
      hasError: false,
      loading: true,
      now: '',
    }
  },
  mounted() {
    this.now = this.$dayjs().format('YYYY-MM-DD')
    axios
      .get(
        'http://dataservice.accuweather.com/forecasts/v1/hourly/1hour/226396' +
        `?apikey=${API_KEY}`
      )
      .then((response) => (this.forecasts = response.data))
      .catch(function (error) {
        console.log(error)
        this.hasError = true
      })
      .finally(() => (this.loading = false))
  },
}
</script>


<style scoped>
.temp {
  margin-top: -2rem;
}
.celcius {
  font-size: 1.7rem;
}
</style>

参考にしたのはこちらのサイト

https://www.npmjs.com/package/iobroker.accuweather

https://www.accuweather.com/

アクセスした際は日本語になっている可能性があるため注意。

axiosのmounted部分、なんでアロー関数じゃなきゃダメなんだろう?と思っていたら、こういうことでした。

なので、functionの外でページのインスタンスであるthisを違う変数に突っ込むと、アロー関数じゃない書き方でもthisが使えるようになるようです。

mounted() {
  this.now = this.$dayjs().format('YYYY-MM-DD')
  const self = this
  axios
    .get(
      'http://dataservice.accuweather.com/forecasts/v1/hourly/1hour/226396' +
      `?apikey=${API_KEY}`
    )
    .then(function (response) {
      console.log(response)
      self.forecasts = response.data
})
// 以下省略
あるいは宣言せずに.bind(this)する
.then(
  function (response) {
    console.log(response)
    this.forecasts = response.data
  }.bind(this)
)