Nuxt.jsでAPIを使う修行を自分に課していました。というわけで、今回はお天気アプリです。
トップページのカードに、このように表示させます。
取ってきている情報自体は、任意の場所のその日のお天気と気温(と日付)だけなのですが、なかなかどうして時間のかかったものです。さて、復習しますか。
雛形となるカードを用意
まずは雛形を用意。お馴染みVuetifyを使っています。
<template>
<div>
<v-card class="mx-auto" max-width="374">
<v-img
height="250"
src="https://images.unsplash.com/photo-1558486012-817176f84c6d?ixid=MnwxMjA3fDB8MHxwaG90by1wYWdlfHx8fGVufDB8fHx8"
gradient="to top, rgba(255,255,255,.4), rgba(255,255,255,.9)"
>
<v-list-item two-line>
<v-list-item-content>
<v-list-item-title class="text-h5">
CURRENT WEATHER
</v-list-item-title>
<v-list-item-subtitle>YYYY-MM-DD</v-list-item-subtitle> // 今日の日付を取ってくる
<v-list-item-subtitle>TOKYO</v-list-item-subtitle>
</v-list-item-content>
</v-list-item>
<v-card-text>
<v-row align="center">
<v-col text-h2 cols="12">
<v-list-item-subtitle>お天気ステータス</v-list-item-subtitle>
</v-col>
<v-col cols="12">
<v-card-subtitle class="text-h1 temp">温度
<span class="celcius">℃</span>
</v-card-subtitle>
</v-col>
</v-row>
</v-card-text>
</v-img>
</v-card>
</div>
</template>
AccuWeatherから情報を取ってくる
さてこのAccuWeather、ちょっと苦戦しました。アクセス1日50回(だったかな?)なら無料のお天気APIです。
https://developer.accuweather.com/
必要なことは大体公式サイトに載っているのですが、ここからお天気の情報を取ってくるには何段階かステップが必要です。
AccuWeatherに登録する
AccuWeatherでAppを作る
APIキーゲト
ロケーションキーをゲト
AccuWeatherに登録する
まずは公式サイトでアカウントを作成します。
https://developer.accuweather.com/
右上のREGISTERからですね。
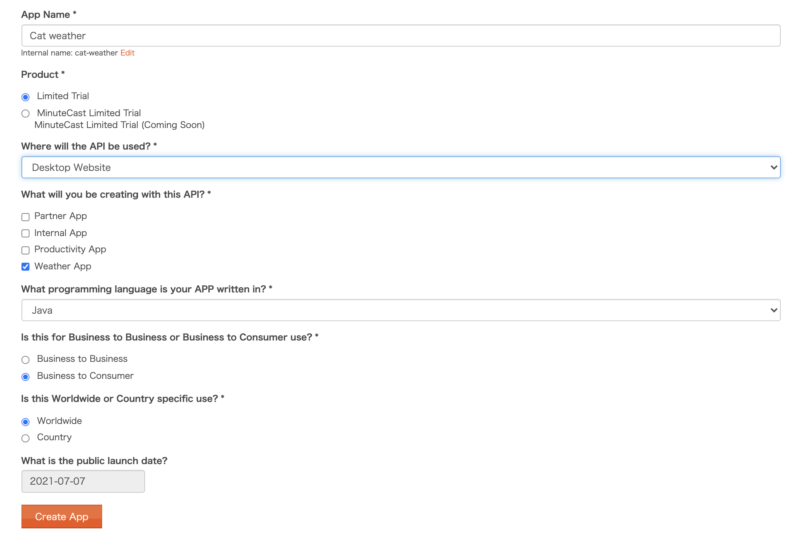
AccuWeatherでAppを作る
諸々入力し終え、アカウントが作成できたら、メニューバーのMY APP からAdd a new Appを選択します。Appの名前とかはどうでもいいです。今回は無料版を使うため、Productの箇所ではLimited Trialを選択しましょう。
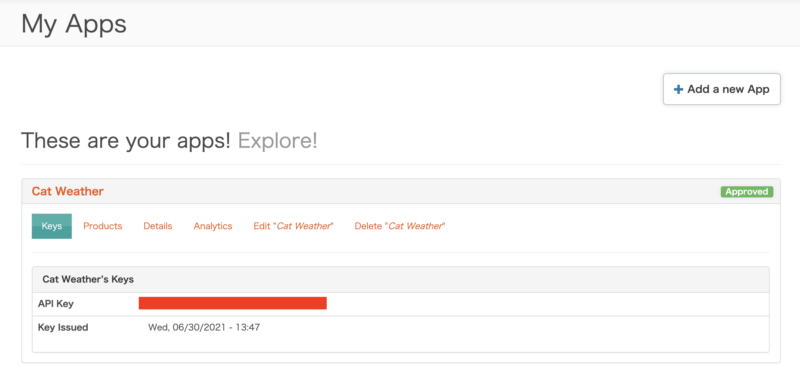
APIキーゲト
上記の設定を終えたらCreate Appボタンを押します。
APIキーが取得できました。
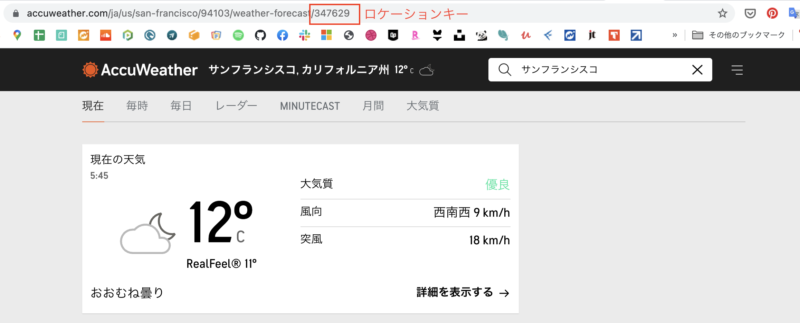
ロケーションキーをゲト
APIキーをゲットしたら次はロケーションキーが必要ですね。
こちらにアクセスするとロケーションキーがわかります。
https://www.accuweather.com/
検索窓から取得したいロケーションを入力します。「東京」や「サンフランシスコ」などで選択肢が表示されます。
ページ遷移した先のURL最後の数字がロケーションキーです。
AccuWeatherのメニューバーAPI REFERENCE > Forecast APIを選択し、取りたいデータを選択します。今回はHour of Hourly Forecastsを選択しました。
https://developer.accuweather.com/accuweather-forecast-api/apis/get/forecasts/v1/hourly/1hour/%7BlocationKey%7D
一番上のResource URLの部分に、お天気情報を取得するためのURLが書かれていますね。
http://dataservice.accuweather.com/forecasts/v1/hourly/1hour/{LOCATIONKEY}
この{LOCATIONKEY}の部分を先ほど取得した数値に置き換え、APIキーをつけてアクセスすると格納されている情報が見られるようになります。
例:http://dataservice.accuweather.com/forecasts/v1/hourly/1hour/226396?apikey=XXX
XXXの箇所は、先ほど取得した自分のAPIに置き換えてください。
アクセス先 Chromeの拡張機能JSON Viewを使うと見やすいです。
こちらのURLをスクリプトのmounted部分で使います。
取得したお天気情報をaxiosでゲットし、変数に代入する
APIキーはconstantsディレクトリのdefine.jsに記載しました。またaxiosはダウンロードしている前提です。インストール方法はこちらから
https://www.npmjs.com/package/axios
export const API_KEY = 'xxx'
<script>
import axios from 'axios'
import { API_KEY } from '~/constants/define'


export default {
  data() {
    return {
      forecasts: [],
    }
  },
  mounted() {
    axios
      .get(
        'http://dataservice.accuweather.com/forecasts/v1/hourly/1hour/226396' +
        `?apikey=${API_KEY}`
      )
      .then((response) => (this.forecasts = response.data))
  },
}
</script>
これで、先ほどアクセスした http://dataservice.accuweather.com/forecasts/v1/hourly/1hour/226396?apikey=XXX の情報をforecasts[]に代入することができました。
画面に天気を表示させてみます。カードにv-forを追加しました。
    <v-card-text v-for="forecast in forecasts" :key="forecast.id">
      <v-row align="center">
        <v-col text-h2 cols="12">
          <v-list-item-subtitle>{{
            forecast.IconPhrase
          }}</v-list-item-subtitle>
        </v-col>
        <v-col cols="12">
          <v-card-subtitle class="text-h1 temp">
            {{ forecast.Temperature.Value | toCelsius | mathFloor }}
            <span class="celcius">℃</span>
          </v-card-subtitle>
        </v-col>
      </v-row>
    </v-card-text>
気温は華氏表記だったため、フィルターを作成し摂氏表記にします。
        <v-col cols="12">
          <v-card-subtitle class="text-h1 temp">
            {{ forecast.Temperature.Value | toCelsius | mathFloor }}
            <span class="celcius">℃</span>
          </v-card-subtitle>
        </v-col>
Scriptには下記を追記
<script>

// 省略
export default {
  filters: {
    toCelsius(value) {
    return ((value - 32) * 5) / 9 // fahrenheit to celsius
    },
    mathFloor(value) {
    return Math.floor(value)
    },
  },
<script>
import axios from 'axios'
import { API_KEY } from '~/constants/define'


export default {
  filters: {
    toCelsius(value) {
    return ((value - 32) * 5) / 9
    },
    mathFloor(value) {
    return Math.floor(value)
    },
  },
  data() {
    return {
      forecasts: [],
      hasError: false,
      loading: true,
      now: '',
    }
  },
  mounted() {
    this.now = this.$dayjs().format('YYYY-MM-DD')
    axios
      .get(
        'http://dataservice.accuweather.com/forecasts/v1/hourly/1hour/226396' +
        `?apikey=${API_KEY}`
      )
      .then((response) => (this.forecasts = response.data))
      .catch(function (error) {
        console.log(error)
        this.hasError = true
      })
      .finally(() => (this.loading = false))
  },
}
</script>
あとは、dayjsを使い今日の日付を表示、error時とloading時の表示を追加して完成です。
      <v-list-item-content>
        <v-list-item-title class="text-h5">
          CURRENT WEATHER
        </v-list-item-title>
        <v-list-item-subtitle>YYYY-MM-DD</v-list-item-subtitle> // 今日の日付を取ってくる
        <v-list-item-subtitle>TOKYO</v-list-item-subtitle>
      </v-list-item-content>

    <v-card-text v-for="forecast in forecasts" :key="forecast.id">
      <section v-if="hasError">Error.</section>. // エラーメッセージを表示
      <section v-else> // エラーじゃない時は正常に表示
        <div v-if="loading">Loading...</div> // ローディング時の表示を追加
          <v-row align="center">
          </v-row>
        </section>
      </v-card-text>
 // 省略

export default {
 // 省略
  data() {
    return {
      forecasts: [],
      hasError: false,
      loading: true,
      now: '',
    }
  },
  mounted() {
    this.now = this.$dayjs().format('YYYY-MM-DD')
    axios
      .get(
        'http://dataservice.accuweather.com/forecasts/v1/hourly/1hour/226396' +
        `?apikey=${API_KEY}`
      )
      .then((response) => (this.forecasts = response.data))
      .catch(function (error) {
        console.log(error)
        this.hasError = true
      })
      .finally(() => (this.loading = false))
  },
}
</script>
完成コード
すみません所々 インデントが合ってないかもしれないです
<template>
  <div>
    <v-card class="mx-auto" max-width="374">
      <v-img
        height="250"
        src="https://images.unsplash.com/photo-1558486012-817176f84c6d?ixid=MnwxMjA3fDB8MHxwaG90by1wYWdlfHx8fGVufDB8fHx8"
        gradient="to top, rgba(255,255,255,.4), rgba(255,255,255,.9)"
      >
      <v-list-item two-line>
        <v-list-item-content>
          <v-list-item-title class="text-h5">
            CURRENT WEATHER
          </v-list-item-title>
         <v-list-item-subtitle>{{ now }}</v-list-item-subtitle> // 今日の日付を取ってくる
         <v-list-item-subtitle>TOKYO</v-list-item-subtitle>
       </v-list-item-content>
     </v-list-item>

      <v-card-text v-for="forecast in forecasts" :key="forecast.id">
        <section v-if="hasError">Error.</section>
        <section v-else>
          <div v-if="loading">Loading...</div>
          <v-row align="center">
            <v-col text-h2 cols="12">
              <v-list-item-subtitle>{{
                forecast.IconPhrase
              }}</v-list-item-subtitle>
            </v-col>
            <v-col cols="12">
              <v-card-subtitle class="text-h1 temp">
                {{ forecast.Temperature.Value | toCelsius | mathFloor }}
                <span class="celcius">℃</span>
              </v-card-subtitle>
            </v-col>
           </v-row>
         </section>
        </v-card-text>
      </v-img>
    </v-card>
  </div>
</template>
<script>
import axios from 'axios'
import { API_KEY } from '~/constants/define'


export default {
filters: {
toCelsius(value) {
return ((value - 32) * 5) / 9
},
mathFloor(value) {
return Math.floor(value)
},
},
  data() {
    return {
      forecasts: [],
      hasError: false,
      loading: true,
      now: '',
    }
  },
  mounted() {
    this.now = this.$dayjs().format('YYYY-MM-DD')
    axios
      .get(
        'http://dataservice.accuweather.com/forecasts/v1/hourly/1hour/226396' +
        `?apikey=${API_KEY}`
      )
      .then((response) => (this.forecasts = response.data))
      .catch(function (error) {
        console.log(error)
        this.hasError = true
      })
      .finally(() => (this.loading = false))
  },
}
</script>


<style scoped>
.temp {
  margin-top: -2rem;
}
.celcius {
  font-size: 1.7rem;
}
</style>
参考にしたのはこちらのサイト
https://www.npmjs.com/package/iobroker.accuweather
https://www.accuweather.com/
アクセスした際は日本語になっている可能性があるため注意。
axiosのmounted部分、なんでアロー関数じゃなきゃダメなんだろう?と思っていたら、こういうことでした。
なので、functionの外でページのインスタンスであるthisを違う変数に突っ込むと、アロー関数じゃない書き方でもthisが使えるようになるようです。
mounted() {
  this.now = this.$dayjs().format('YYYY-MM-DD')
  const self = this
  axios
    .get(
      'http://dataservice.accuweather.com/forecasts/v1/hourly/1hour/226396' +
      `?apikey=${API_KEY}`
    )
    .then(function (response) {
      console.log(response)
      self.forecasts = response.data
})
// 以下省略
あるいは宣言せずに.bind(this)する
.then(
  function (response) {
    console.log(response)
    this.forecasts = response.data
  }.bind(this)
)
![[Nuxt.js]2.9以下 Google material icon(マテリアルアイコン)を使う](https://nolyc.net/wp-content/uploads/2022/04/nuxt.png)
![[Nuxt.js, Vue.js, ESLint]監視プロパティwatchではアロー関数が使えない](https://nolyc.net/wp-content/uploads/2021/07/Untitled_Artwork.png)


![[Nuxt.js]AccuWeatherのAPIを使ってお天気アプリを制作](https://nolyc.net/wp-content/uploads/2021/07/スクリーンショット-2021-07-07-21.03.04.png)

![[Nuxt.js]componentsのButtonを使ってDeleteボタンDeleteBtnを実装](https://nolyc.net/wp-content/uploads/2021/06/スクリーンショット-2021-06-29-15.19.25.png)