[VSCode, Prettier]勝手にダブルクォーテーションにしないで

VSCodeでプロジェクトをクローンしてきたら、保存時にPrettierさんがシングルクォーテーション(”)をダブルクォーテーション(””)に変えてくれていました(嫌味)。
どちらがいいかはまあ…宗派や使用しているツールに依る思いますが、既存のプロジェクトで勝手に変えられるのは困ります。

と言うわけで設定を変更。
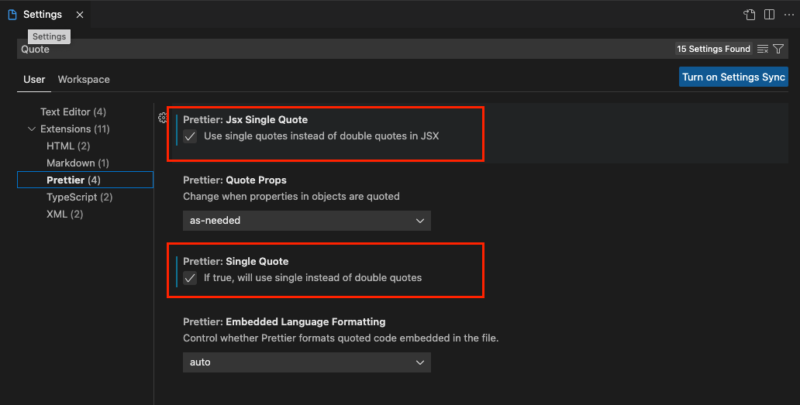
Setting (Ctrl + ,)の検索窓から「Quote」で検索し、検索結果のサイドメニューからPrettierを選択。

2つのチェックボックスにチェックを入れます。

お疲れ様でした。

と思いきや

全然直ってませんでした。

Prettierの設定ファイルを作成

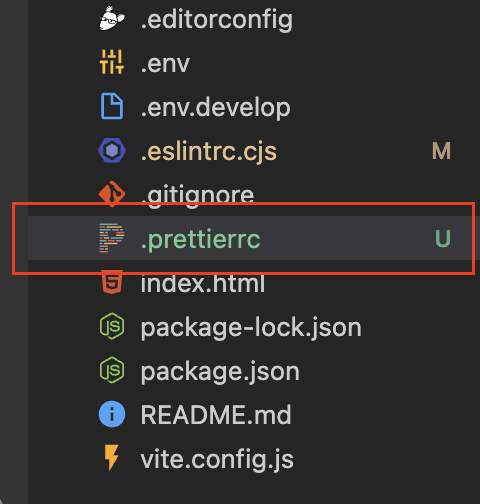
プロジェクトディレクトリ直下に.prettierrcファイルを作成し、

以下を記述。

{
  "singleQuote": true,
}

今度こそ直りました。

他にも希望の設定を付け足せます。

{
  "semi": false,
  "arrowParens": "always",
  "trailingComma": "es5",
  "singleQuote": true,
  "quoteProps": "preserve",
  "endOfLine": "auto"
}

参考

https://stackoverflow.com/questions/48864985/vscode-single-to-double-quote-automatic-replace


Quotation mark (引用符) / シングルクォーテーション(”) / ダブルクォーテーション / VSCode / Prettier

SourceMap(ソースマップ)ってなんぞ

gulpを使ってみて、gulp-sourcemapsというモジュールが便利そうだったので調べたことをメモ。そもそもSouceMapとは何か。

ソースマップとは

ブラウザで利用されているJavaScriptはコンパイルされているが、何かエラーが起こった際に、コンパイルされたままだとエラー箇所がよくわからず、不便。そのため、最適化やコンパイルされる前のJavaScriptを保持したソースファイルを作っておくと、後々便利、といったもの。

source map is a file that maps from the transformed source to the original source, enabling the browser to reconstruct the original source and present the reconstructed original in the debugger.
To enable the debugger to work with a source map, you must:
generate the source map
– generate the source map
– include a comment in the transformed file, that points to the source map. The comment’s syntax is like this:
//# sourceMappingURL=http://example.com/path/to/your/sourcemap.map

Use a source map

意訳:
ソースマップはオリジナルファイルから変換されたソースをマップしたファイルで、ブラウザがオリジナルのソースを再構築し、その再構築されたオリジナルをデバッガーに表示できるようにするものだ。
ソースマップでそのデバッガーを有効にするには、ソースマップを生成する必要がある。

  • まず、ソースマップを生成
  • 再構築されたファイル内に、ソースマップを指定するコメントを記述

コメントは以下の形式

//# sourceMappingURL=http://example.com/path/to/your/sourcemap.map

こうなることも想定

//# sourceMappingURL=main.js.map

動画でも解説あり。
https://youtu.be/Fqd15gHC4Pg

In the video above we load https://mdn.github.io/devtools-examples/sourcemaps-in-console/index.html. This page loads a source called “main.js” that was originally written in CoffeeScript and compiled to JavaScript. The compiled source contains a comment like this, that points to a source map:
//# sourceMappingURL=main.js.map
In the Debugger’s source list pane, the original CoffeeScript source now appears as “main.coffee”, and we can debug it just like any other source.

Use a source map

以下も意訳。元記事・動画はFirefoxを使っているが、意訳ではChromeを使用した場合の記載に書き換えている。

例えば、こちらのサンプルページ。
https://mdn.github.io/devtools-examples/sourcemaps-in-console/index.html

検証ツール-> Sources を開き、jsフォルダの中身を見てみよう。
このページでは、もともとCoffeeScriptで書かれ、コンパイルされたmain.jsというJavaScriptを読み込んでいる。このコンパイルされたソースコードには以下のコメントが挿入されており、これがソースマップを指しているのだ。

//# sourceMappingURL=main.js.map

デバッガーのSourcesパネルには、オリジナルのソースであるmain.coffeeが表示されており、まるで別のソースをいじるかのようにして、我々はこのソースをデバッグできるのである。

以上メモおしまい

Google 構造化データの解析エラー:「}」またはオブジェクト メンバーの名前がありません

Google 構造化データの解析エラー:「}」またはオブジェクト メンバーの名前がありません

サイトの情報を構造化データとしてheaderに入れておくことで、Google検索結果で魅力的に表示されやすくなる手法、構造化データマークアップ。検索結果にレシピや店舗情報が、一般の検索結果とは別にまとめて表示されてあるのを見たことがありませんか?そう、アレです。

構造化データマークアップなんのこっちゃという方は公式をご覧ください。

さてこの構造化データマークアップ、書式が厳密なため、ちょっとした記載のミスでもサーチコンソールや構文チェックツールでエラーが出たりします。

構文チェックツール
https://search.google.com/test/rich-results

今日は、その中でも最も遭遇するであろうエラー「解析エラー:「}」またはオブジェクト メンバーの名前がありません」について、解説します。

解析エラー:「}」またはオブジェクト メンバーの名前がありません

公式では、このエラーの説明は以下のように記載されています。

右かっこまたはオブジェクト メンバー名がありません。

解析できない構造化データのレポート

てっきり}を書き忘れてエラーになっているのかと思いきや、そうではありませんでした。
結論から言うと、このエラーの原因は大まかに3つ。

  1. {}ブロックの最後に不要なコンマを入れている
  2. シングルクオーテーション(”)を使用している
  3. インデントがスペースになっていない

順番に解説します。

1. {}ブロックの最後に不要なコンマを入れている

JSON-LD で記載する構造化データでは、最後の{}ブロックにコンマ(,)を入れてはいけないことになっています。私はNuxt.jsだと敢えて入れるようにしていたので、これには面食らいました(知らんがな)。

悪い例

<script type="application/ld+json">
{
    "@context": "http://schema.org",
    "@type": "Article",
    "mainEntityOfPage": {
        "@type": "WebPage",
        "@id": "http://hoge.bar", // ここのコンマ不要
    }, // ここのコンマ不要
    // 省略
}
</script>

良い例

<script type="application/ld+json">
{
    "@context": "http://schema.org",
    "@type": "Article",
    "mainEntityOfPage": {
        "@type": "WebPage",
        "@id": "http://hoge.bar" // コンマ取った
    } // コンマ取った
    // 省略
}
</script>

2. シングルクオーテーション(”)を使用している

この質問はGoogleのSearch Consoleヘルプにも上がっているのですが、Googleではシングルクオーテーション(単一引用符。)は受け入れられず、全てのキーと値はダブルクオーテーション(二重引用符。“”)を使用する必要があります。
# お仕事検索の構造化データで、JSON-LD 「「}」またはオブジェクト メンバーの名前がありません。」のエラー原因が分かりません。教えてください

悪い例

<script type="application/ld+json">
{
    '@context': 'http://schema.org',
    '@type': 'Article',
    'mainEntityOfPage': {
        '@type': 'WebPage',
        '@id': 'http://hoge.bar'
    }
    // 省略
}
</script>

良い例

<script type="application/ld+json">
{
    "@context": "http://schema.org",
    "@type": "Article",
    "mainEntityOfPage": {
        "@type": "WebPage",
        "@id": "http://hoge.bar"
    }
    // 省略
}
</script>

3. インデントがスペースになっていない

上記2つをチェックしても問題がないのに、エラーが出続ける場合。それは、インデントの設定にあるかもしれません。

悪い例

    <script type="application/ld+json">
        {
            "@context": "https://schema.org",
            "@type": "Article",
            "mainEntityOfPage": {
            "address": {
                "@type": "WebPage",
                "@id": "http://hoge.bar"
            }
        }
    </script>

良い例

    <script type="application/ld+json">
    {
      "@context": "https://schema.org",
      "@type": "Article",
      "mainEntityOfPage": {
      "address": {
        "@type": "WebPage",
        "@id": "http://hoge.bar"
      },
    }
  </script>

はい、何が悪いのかさっぱりですかね。

悪い例

私は以前、インデントの設定をtabにしていたのですが、タブにしていると、列を選択した時のインデントは「→」となっているはずです。スペースであれば、下記のようになります。

インデントがスペースになっているか、確認し、なっていなければ修正しましょう。

好みもありましょうが、私は職場の先輩から「環境によってタブの見え方が変わるからスペースの方が良い」と言われてから、VSCodeの設定を変更しました。
インデントを整える際、tabを押下するのには変わりませんが、tabを押したときに入力される値がスペース2つ分になるという仕組みです。

VSCode設定方法

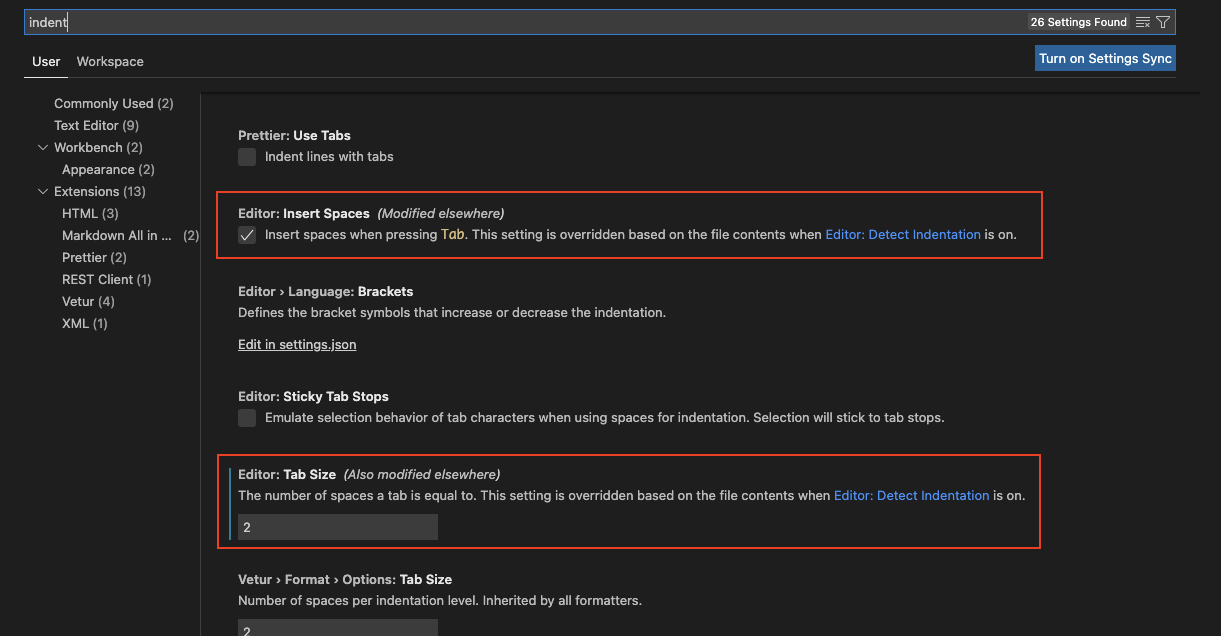
Ctrl+,(Win)あるいは +,(mac)で設定画面に移動します。

InsertSpacesにチェック / TabSize 2 / 画面下部のスペースが2以外ならクリックして2に設定

DreamWeaverの場合は、
環境設定 → コードフォーマット → インデント 4 スペース / タブサイズ 4 (スペースとして挿入)

以上です。Have a happy coding life!!

[Nuxt.js]雑記。Createdとmounted、$elと$refなど

Nuxt.jsのCreatedとmounted、$elと$refについての備忘録。
Nuxtについて調べていると、Vue.jsのドキュメントの方が充実しているため、Nuxtでの適用方法が分からなかったりする。
基本的にはVue.jsと同じ仕組みだが、ここではNuxtでの書き方・特徴にフォーカスして書く。

免責
初学者です。間違っていたらご指摘ください。

Created \ mountedの違い

Vueでel: '#app',と書くと、それはVueインスタンスそのものを指す。

<script>
new Vue({
    el: '#app',
}) 
</script>

Nuxt
mountedやcreatedでの挙動を確かめようと思い、以下のようにしてみる。Nuxtでは、Vueをnewしたりel: '#app',を定義する必要はない。デフォルトでされる。

created() {
    console.log('created')
    console.log(this.$el)
},
mounted() {
    console.log('mounted')
    console.log(this.$el)
},

結果

created
undefined
mounted
▶︎<div></div>

ここで使用した$elは、DOMに直接アクセスして取得し(ようとし)た、Vueインスタンスcomponentsのルート(html要素の最上位)。

Nuxtライフサイクルでは、createdがDOM生成、mountedがDOM生成(直)後とされているため、createdで定義したthis.$elはundefinedになる。

余談

では、Vueにおけるel: '#app',をNuxtで取得したい場合はどういう風に書けばいいのかというと、thisを使えば良い。

export default {
    data() {
        return {
            el: this,
        }
    },
    created() {
        console.log('created')
        console.log(this.el)
    },
}

VueインスタンスそのものであるthisはDOMを参照しないのでcreatedでもmountedでも結果は同じ。

結果

created
▶︎ VueComponent&nbsp;{_uid: 34, _isVue: true, __v_skip: true, _scope: EffectScope, $options: {…},&nbsp;…}

なので、関数内などでもVue componentを使いたい、このthisの挙動を変えたくない場合などは、data内でself: thisとかなんとか定義しておいて、thisの代わりにself.hogeなどとする方法もある。って母方のばーちゃんが言ってた。

ちょっと脱線(computed vs methods)

computed

computedは、計算機能付きのプロパティである。
getterとsetterがあり、get()/set()を省略するとcomputedはgetterとなる。
変数への代入はsetterで行い、getterでは基本的にグローバルな変数への代入はできない。
どうしてもgetterで代入を行いたい時は関数を用意する。
計算結果をキャッシュするので、再計算が必要ない場合、一度行った計算結果を返す速度が速い。プロパティなので呼び出し時は()不要。
以下Nuxt componentに渡した値を変更する例。依存関係にある値が変わった時に自動計算したい時などにピッタリ!

<template>
  <div>
    <v-text-field
      :id="id"
      v-model="innerValue"
      :label="label"
      @input="input"
    ></v-text-field>
  </div>
</template>
<script>
export default {
  props: {
    value: {
      type: [String, Number],
      default: '',
    },
    id: {
      type: String,
      default: '',
    },
    label: {
      type: String,
      default: '',
    },
    input: {
      type: Function,
      // eslint-disable-next-line
      default: () => {},
    },
  },
  computed: {
    innerValue: {
      get() {
        return this.value
      },
      set(val) {
        this.$emit('input', val)
      },
    },
  },
}
</script>

関数にする場合

computed: {  // 関数として実装、参照時はプロパティとして機能
&nbsp;&nbsp;&nbsp;&nbsp;算出プロパティ名: function() {
&nbsp;&nbsp;&nbsp;&nbsp;&nbsp;&nbsp;// return ...
}

methods

一方、メソッドはgetterのみ。setterは使えない。呼び出し時は <button @click="メソッド名()">送信</button>のように()が必要。
送信ボタンが押された時、など、アクションが起きた時の処理にピッタリ!

methods: {
&nbsp;&nbsp;&nbsp;&nbsp;メソッド名: function() {
&nbsp;&nbsp;&nbsp;&nbsp;&nbsp;&nbsp;// 処理
}

\$elと\$ref

\$elも\$refもVueインスタンスが持つプロパティ。他にも以下のようなものがある。

  • $data
  • $props
  • $el
  • $options
  • $parent
  • $root
  • $slots
  • $refs
  • $attrs

\$el

ここで使用した$elは、DOMに直接アクセスして取得し(ようとし)た、Vueインスタンスcomponentsのルート(html要素の最上位)。

先に述べたように、\$elは要素の最上位であるルート(html)のDOM要素。型はany

\$ref

一方\$refはref属性をつけたDOM要素とcomponentインスタンスのオブジェクト。
htmlにおけるidのようなもので、ref=""の形で要素にツバをつけておいて、\$refで要素を参照できる。型はobject。

<template>
    <button ref="hello">Hello</button>
</template>
<script>
  mounted() {
    console.log('$refs')
    console.log(this.$refs.hello)
  },
</script>

結果

$refs
▶︎ VueComponent&nbsp;{_uid: 83, _isVue: true, __v_skip: true, _scope: EffectScope, $options: {…},&nbsp;…}

参考

# 【Vue.js】createdとmountedの違い
# 【Vue.js】 DOMを直接操作 $el $ref
# 【Vue】getterとsetterの使い方。大元の変数を間接的に変更する方法
# Vueのcomputedとmethodsの「使い分け」を解説
# インスタンスプロパティ($data、$props、$el、$options、$parent、$root、$slots、$refs、$attrs) [Vue.js]
[Nuxt.js]FusionCharts導入覚書 – Vueフレームワーク編

前回書いた[Nuxt.js]FusionCharts導入覚書 – Plain javascript編のvueバージョンです。

以前はVueフレームワークバージョンのfusionChartsを使うと動かなかったのですが、大先輩の偉大な助けにより解決したので備忘録。
結論から言うと、FusionChartsのプラグイン化が必要でした。

Vueを使っている人は、シンプルにこちらを参照すれば実装できると思います。
https://cfusioncharts.com/dev/getting-started/vue/your-first-chart-using-vuejs

バージョン

  • MacOs 12.1
  • node v16.2.0
  • yarn 1.22.10
  • nuxt 2.15.7
  • fusioncharts 3.18.0

ライブラリを追加

fusionchartsは3系だとエラーが出るので2系に。該当のプロジェクト内で下記を実行。

$ yarn add fusioncharts
$ yarn add 'vue-fusioncharts@^2.0.4'

npm の人

$ npm install fusioncharts vue-fusioncharts --save
$ npm install vue-fusioncharts@^2.0.4' --save

plugins/fusioncharts.js

pluginsにDependencyを追加。
チャートの種類などはここに記載されている。
https://www.fusioncharts.com/dev/chart-guide/list-of-charts

import Vue from 'vue'
import VueFusionCharts from 'vue-fusioncharts'
import FusionCharts from 'fusioncharts'
import Charts from 'fusioncharts/fusioncharts.charts'
import FusionTheme from 'fusioncharts/themes/fusioncharts.theme.fusion'

Vue.use(
  VueFusionCharts,
  FusionCharts,
  Charts,
  FusionTheme
)

nuxt.config.js

plugins: [{ src: '~/plugins/fusioncharts.js', ssr: false }],

pages/chart.vue

ページ名はなんでもいいですが…

<template>
  <div>
    <Header></Header>
    <section class="container">
      <client-only>
        <div>
          <fusioncharts
            :type="type"
            :width="width"
            :height="height"
            :dataFormat="dataFormat"
            :dataSource="dataSource"
          ></fusioncharts>
        </div>
      </client-only>
    </section>
  </div>
</template>

<script>
export default {
  data() {
    return {
      width: '100%',
      height: '400',
      type: 'column2d',
      dataFormat: 'json',
      dataSource: {
        'chart': {
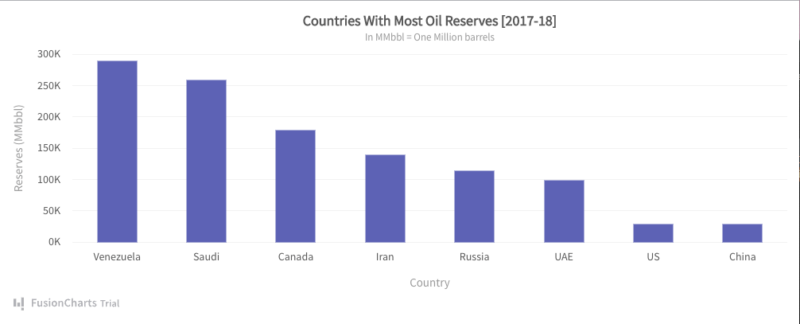
          'caption': 'Countries With Most Oil Reserves [2017-18]',
          'subCaption': 'In MMbbl = One Million barrels',
          'xAxisName': 'Country',
          'yAxisName': 'Reserves (MMbbl)',
          'numberSuffix': 'K',
          'theme': 'fusion',
        },
        'data': [
          {
            'label': 'Venezuela',
            'value': '290',
          },
          {
            'label': 'Saudi',
            'value': '260',
          },
          {
            'label': 'Canada',
            'value': '180',
          },
          {
            'label': 'Iran',
            'value': '140',
          },
          {
            'label': 'Russia',
            'value': '115',
          },
          {
            'label': 'UAE',
            'value': '100',
          },
          {
            'label': 'US',
            'value': '30',
          },
          {
            'label': 'China',
            'value': '30',
          },
        ],
      },
    }
  },
}
</script>

[Nuxt2]初期設定備忘録

nuxt.jsのプロジェクトを作成するたびに前回の作成から時間が空いてしまい、「あれ初期設定どうしてたっけ」となりがちなので自分用に備忘録。

  • OS MacOS Monterey 12.1
  • Node v16.2.0
  • npm 7.20.0
  • Nuxt.js 2.15.7

まずはプロジェクト作成

$ npm init nuxt-app test-project

設定項目

画像でドン!

参考

https://ma-vericks.com/blog/nuxt-init/

axios追加

インストール

npm install --save @nuxtjs/axios

nuxt.config.jsに追記

  modules: [
    // Doc: https://axios.nuxtjs.org/usage
    "@nuxtjs/axios",
  ],

参考

https://public-constructor.com/nuxtjs-with-axios/

vuetifyのdarkモードをfalseに

フレームワークでvuetifyを選択した場合、dark modeがtrueになっているので設定を削除しtrueをfalseに書き換え。

  vuetify: {
    customVariables: ['~/assets/variables.scss'],
    theme: {
      dark: false,
    },
  },

いらないものを削除

デフォルトの要素たちにセイ・グッバイ

layouts/default.vueの中身にさよなら

<v-app></v-app>の中をざっくり消して、<Nuxt />だけ残す。今回はVuetifyのサイジングを使用するので<v-main><v-container>も残しました。footerはコンポーネント実装にするなら消す。今回はlayouts実装でいいや。ということで残した。

// layouts/default.vue
<template>
  <v-app>
    <v-main>
      <v-container>
        <Nuxt />
      </v-container>
    </v-main>
    <v-footer :absolute="!fixed" app>
      <span>&copy; {{ new Date().getFullYear() }}</span>
    </v-footer>
  </v-app>
</template>

index.vueの中身にさよなら

まっさらな状態に。

<template>
  <div></div>
</template>

components配下のディレクトリパスを設定

atomic designを採用しているが、初期のままだとコンポーネント名の頭にディレクトリ名をつけなければならないため(例<MoleculesHeader />)、パスを通す。nuxt.config.jsに以下を記載。

  components: {
    dirs: [
      '~/components',
      '~/components/atoms',
      '~/components/molecules',
      '~/components/organisms',
    ],
  },

こちらにも書いた

eslintrcのルール変更

console.logなど、よく使用する機能に関してはエラーが出ないよう、.eslintrc.jsにルールを追加しておく。

  rules: {
    'no-console': 'off', // console.log();OK
    'no-unused-vars': 'off', // 使っていない変数あってもOK
    // ↓空白行に対してwarnのみ出るようにする。
    'no-multiple-empty-lines': ['warn', { max: 1 }],
    'no-empty-function': 'off', // 空のfunctionあっても大丈夫
    'spaced-comment': 'off', // //の後にスペースかtabなくてもOK
  },

一旦ここまで。また思い出したら追記。

その他参考

vuetifyについてわかりやすかった記事

https://dev83.com/vue-vuetify-basic/

[Nuxt.js]Take Over Modeって何?って話

https://v3.nuxtjs.org/getting-started/quick-start/

Nuxt.js 3のget startedを読んでいたところ、VSCodeの設定でわからない箇所が。

Prerequisitesに

とあったのでTake Over Modeを入れようと下記URLの内容を参考に取り掛かるも、

https://github.com/johnsoncodehk/volar/discussions/471

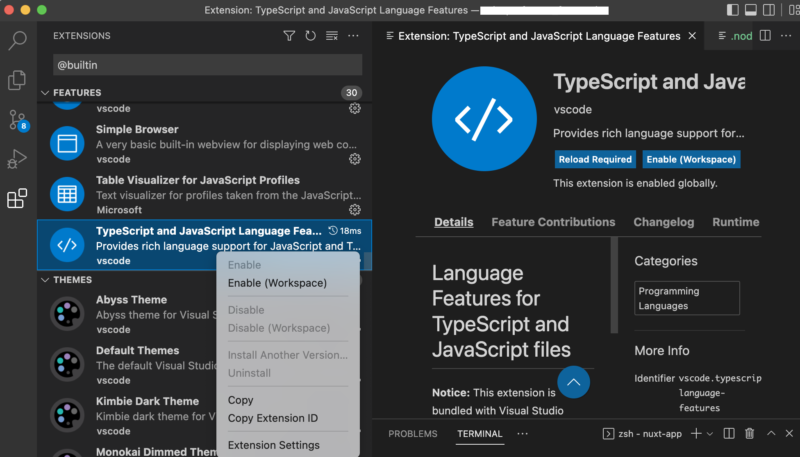
How to enable Take Over Mode?に書いてある2のやり方(Run Extensions: Show Built-in Extensions command)がわからなかったのです。

  1. Update Volar to 0.27.17.
  2. Disable built-in TypeScript extension:
    2.1. Run Extensions: Show Built-in Extensions command
    2.2. Find TypeScript and JavaScript Language Features, right click and select Disable (Workspace)
  3. Reload VSCode, and then open any vue file to trigger Volar activation (no longer need in 0.28.4).

Extensions: Show Built-in Extensionsってどうやるんじゃ!!

VSCode

答えはこちらにありました。

https://code.visualstudio.com/docs/editor/extension-marketplace

Extensionsの検索窓から@builtinでフィルターをかけられるよ、というもの。検索結果からTypeScript and JavaScript Language Featuresを探し、右クリックからdisable(Workspace)を選択します。

Run Extensions: Show Built-in Extensions commandなので文字通りコマンドからやる方法があるんでしょうけど、わからなかったので手動です。

誰か賢い方、教えてください。

nodenv,anydenvを使ったNode.jsのアップデート

Nuxt.js 3が出ましたね。

https://v3.nuxtjs.org/getting-started/quick-start

でもnodeバージョンは14.16 か 16.11. 以上でないとダメらしいです。

* If you already have Node.js installed, check with node --version that you are using version 14.16 or above 16.11.

nodenv install --list

で、今入っているバージョンを確認。しかし、nodenvはインストール時に登録されているバージョンしか表示されないそう。

というわけでnodeをバージョンアップします。

以前、node.jsのバージョン切り替え方法を書いたのですが、

[node.js]バージョン切り替え方法

nodenv,anydenvが入っている方は

anyenv update

これでOK!

あとはもう一度インストール済のバージョンを確認いただいて、インストール。

nodenv install --list
nodenv install 18.4.0

バージョンを上げたいプロジェクトディレクトリで切り替えます。

nodenv local 18.4.0 node -v


おしまい。

おまけ

18.4.0でnuxt 3動きましたよ!!

npx nuxi init nuxt-app

VSCodeでnuxt-appフォルダをOpenし、dependenciesをインストール。

npm install

devサーバでスタート。

npm run dev -- -o

めちゃめちゃエラー出るやないかい!!

でも起動はする。

めでたしめでた…し?

[git]既に作成したディレクトリ名を変更

既にgit管理しているプロジェクトのディレクトリ名を変えたい時があります。そんな時は、gitコマンドでディレクトリ名を変更します。

対象ディレクトリへ移動(cd)し、

$ git mv before/ after/

ちなみに、既にmv before/ after/ をしていたり、finderなどから名前を変更してしまったりしていると、たとえ元に戻したとしてもエラーを吐きます。

$ mv before/ after/
$ git mv xxx_frontend yyy_frontend
$ fatal: bad source, source=before, destination=after/

初期段階だったので、gitごと消してgit initしました。

$ rm -rf .git/
$ mv before after
$ git init

参考

https://qiita.com/b4b4r07/items/cac4abd9ae66537e2833

[Nuxt.js]FusionCharts導入覚書 – Plain javascript編

Nuxt.jsでFusionChartsを入れたので、その覚書。

最初はVueフレームワークで導入を試みようとしたのですが、エラーが消えなかったので断念。VueとNuxtの超えられない壁を感じたのですが、githubにnuxtで動かしている人もいて、多分nuxtでも動かせるんだろうけど、私の知識不足により実現できていません

先輩の偉大な助けにより、vue dependencyをプラグイン化することで解決しました。ありがたやありがたや。

[Nuxt.js]FusionCharts導入覚書 – Vueフレームワーク編

ちなみに該当githubはこちら。プロジェクトをDLして動かしたら、選択できる地図が現れました。気になる方は動かしてみてください。

https://github.com/ICJIA/fusioncharts-test

Plain JavaScriptで動かす

というわけで、シンプルにPlain JavaScriptで動かすことにしました。

公式のGet Startedはこちらです。

https://www.fusioncharts.com/dev/getting-started/plain-javascript/your-first-chart-using-plain-javascript

前提条件

npmでfusionchartsをインストールする場合は、Node.jsのインストールが必要です。

インストール

CDN、ローカルファイル、npmのそれぞれでインストールする方法があります。

CDNの場合は、nuxt.config.jsのhead: { script: [ {src: ”,}, ],}部分にcdnソースを2つ、盛り込みましょう。


  head: {
    script: [
      // Step 1 - Include the fusioncharts core library
      {
        src: 'https://cdn.fusioncharts.com/fusioncharts/latest/fusioncharts.js',
      },
      // Step 2 - Include the fusion theme
      {
        src: 'https://cdn.fusioncharts.com/fusioncharts/latest/themes/fusioncharts.theme.fusion.js',
      },
    ],

はい。

私はnpmでインストールしました。

既存のnuxt.jsプロジェクトディレクトリで、npmを叩くだけ。先に最新のwebpackを入れておきます。

$ npm install webpack webpack-cli --save-dev
$ npm install fusioncharts

テンプレートを用意

pages>fusioncharts>index.vueを作成し、templateを用意。必要なdependencyをimportします。

<template>
  <div>
    <div id="chart-container">FusionCharts XT will load here!</div>
  </div>
</template>

<script>
// Include the core fusioncharts file from core
import FusionCharts from 'fusioncharts/core'
// Include the chart from viz folder
import Column2D from 'fusioncharts/viz/column2d'
// Include the fusion theme
import FusionTheme from 'fusioncharts/themes/es/fusioncharts.theme.fusion'
// Add the chart and theme as dependency
// E.g. FusionCharts.addDep(ChartType)
FusionCharts.addDep(Column2D)
FusionCharts.addDep(FusionTheme)
</script>

これで準備完了です。

データを用意

チャートを作成するにはデータが必要ですね。例として、ここでは世界の石油保有国とその量を示した2D chart を表現することにしましょう(公式に沿ってるだけですよ)。

<script></script>内importの下に、chartDataを定義します。x軸となるデータラベルをlabel、y軸となるデータバリューをvalueとして、オブジェクトにします。この辺はconstants/define.jsとかに書いてindex.vueでimportした方がnuxtっぽいけど。


// Preparing the chart data
const chartData = [
  {
    label: "Venezuela",
    value: "290"
  },
  {
    label: "Saudi",
    value: "260"
  },
  {
    label: "Canada",
    value: "180"
  },
  {
    label: "Iran",
    value: "140"
  },
  {
    label: "Russia",
    value: "115"
  },
  {
    label: "UAE",
    value: "100"
  },
  {
    label: "US",
    value: "30"
  },
  {
    label: "China",
    value: "30"
  }
];

チャート設定

データが用意できたので、いよいよ次はチャートの設定部分です。以下では公式の例をそのまま載せていますが、掲載されているオプションを元に色々カスタマイズができます。

// Create a JSON object to store the chart configurations
const chartConfig = {
  // チャートのタイプ
  type: "column2d",
  // Set the container object
  renderAt: "chart-container",
  // Specify the width of the chart
  width: "100%",
  // Specify the height of the chart
  height: "400",
  // Set the type of data
  dataFormat: "json",
  dataSource: {
    chart: {
      // Set the chart caption
      caption: "Countries With Most Oil Reserves [2017-18]",
      // Set the chart subcaption
      subCaption: "In MMbbl = One Million barrels",
      // Set the x-axis name
      xAxisName: "Country",
      // Set the y-axis name
      yAxisName: "Reserves (MMbbl)",
      numberSuffix: "K",
      // Set the theme for your chart
      theme: "fusion"
    },
    // Chart Data from Step 2
    data: chartData
  }
};

FusionChartsをmoutedで描画

最後に、FusionChartsをMountedします。

export default {
  mounted() {
    FusionCharts.ready(function () {
      console.log('passed FunctionChart')
      const fusioncharts = new FusionCharts(chartConfig)
      fusioncharts.render()
    })
    console.log('mounted!')
  },
}

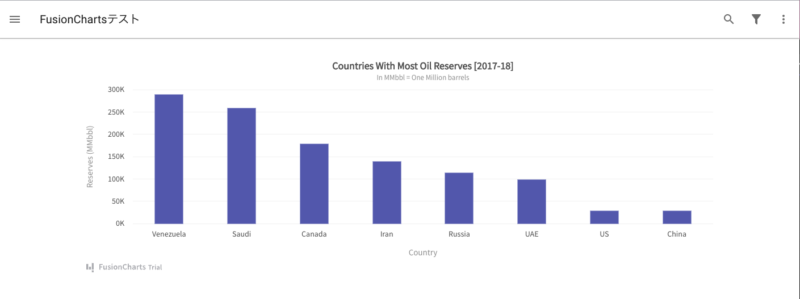
npx nuxtした際の見た目

FusionCharts